Print a DIY Christmas wreath template and explore our teacher team's Christmas wreath ideas for kids!
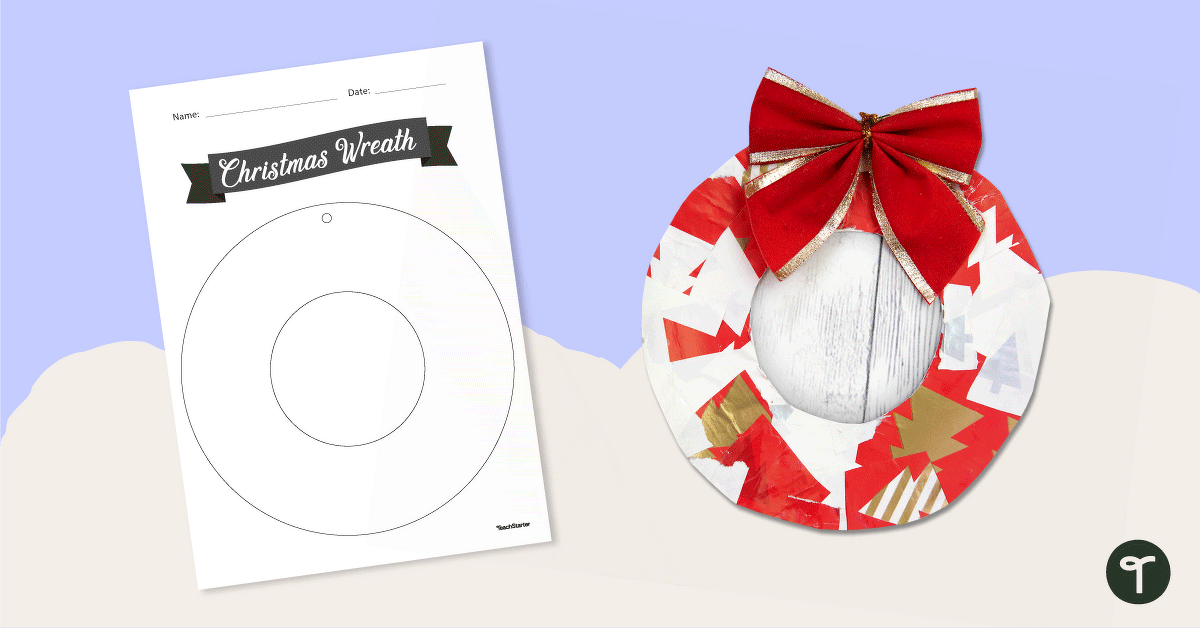
Bring a DIY element to your Christmas craft in the classroom with this printable Christmas wreath template!
Christmas Wreath Craft for Kids
Unlike a paper plate that may or may not yield a circular wreath, this DIY Christmas wreath template has clear lines for students to practice their scissors skills, and you can print out as many copies as you like to include every student in the Christmas craft. You might like to print extra copies for students to take home to make wreaths at home as well!
The beautiful thing about this Christmas teaching resource is that it encourages students to use their imagination to create something wonderful. Giving students autonomy over their work can be a breath of fresh air at this busy time of year.
How to Make a Christmas Wreath With Students
Looking for ways to make a Christmas wreath with your students that is unique as they are? Our teacher team has come up with a few fresh ways to give your students some ideas of how to decorate this template. Alternatively, provide them with a range of art and craft equipment, and let them design their own!
Your students can either decorate the wreath on the paper or cut out the circle to create a hanging wreath.
Christmas Collage Wreath
Our first DIY Christmas wreath idea for your classroom is to create Christmas collage with a twist. This craft is perfect for younger students who may still be working on their fine motor skills and makes good use of those leftover bits of wrapping paper and old holiday cards!

Materials:
- Christmas Wreath Template
- scraps of Christmas wrapping paper (why not see if families have some left over from last year?) or Christmas cards
- a Christmas ribbon or embellishment to add the final touches
- craft glue and brushes
To create:
(Hint – For younger students, pre-cut the circles so that they can simply trim off the excess paper at the end.)
- Collage tiny scraps of paper over the wreath template. Try not to leave any gaps!
- Once the glue has dried, cut out the circle template (look for it through the back of the card).
- Punch a hole in the top of the wreath, and affix a ribbon or embellishment. Attach a string if you wish to hang these around your room!
If you don’t have access to Christmas wrapping paper, why not use magazine cut-outs in red, green, white, and gold?
Christmas Fabric Wreath
Put out the word to families for some Christmas-themed fabric. If there isn’t much going around, head on over to your local haberdashery store for some cheap fabric quarters!
You won’t need many to go around. I cut my fabric into 3cm-thick strips that were about 40cm long, so a little fabric goes a long way.
Materials:
- Christmas Wreath Template
- strips of Christmas-themed fabric, cut to about 3cm wide by 40cm long.
- a printout of our Christmas Bauble Templates for each child (tip: print each on A5 paper)
- stapler
To create:
(Hint – For younger students, pre-cut the circles so that they can simply trim off the excess paper at the end.)
- Pre-cut each wreath template out. Younger students may need help with this step.
- Staple one end of a strip of fabric to the wreath. Wrap around so that it moves around the wreath, overlapping slightly.
- Where the one-piece ends, start with the next piece. Staple over the ends of both pieces so they’re attached to the wreath.
- Once you’ve completely wrapped the wreath in fabric, cover any fabric ends that are visible on the front with the completed Christmas Bauble Templates.
Natural DIY Christmas Wreath
Send your students on a scavenger hunt, or ask them to bring in things from home. However, make sure you tell them to take care of nature and only collect things they find on the ground! Teacher tip: The items collected won’t stay fresh for long, so make sure they’re scavenged on the day of the activity.
Materials:
- Christmas Wreath Template
- a selection of found natural objects such as leaves, flower petals, seed pods, etc.
- coloured pens or pencils
- craft glue and paintbrushes
To create:
- Colour the wreath template a plain green colour or a base colour of your choice.
- Layer a selection of greenery over the green pen. You may need to be patient with your glue and allow it time to dry with the lumpy bumpy foliage.
- Decorate around the rest of the wreath with a selection of leaves, flowers and other assorted objects! The more glue, the easier the heavy items will stick to the page.
- Allow your creation lots of time to dry so that you don’t lose any of the attachments.
More DIY Activities for Kids
Feeling inspired and looking for more DIY activities for kids for your classroom? Explore these unique resources from our teacher team!




Thank you so much, this is lovely.
Hi Isabella, Thank you for your lovely comment! We are so glad you are enjoying our resources. Kind regards, Emma